Thursday, September 26, 2013

Little Bow Pleat Bag: Pattern testing and giveaway!

I'm so excited to finally share a project that I tested a few weeks ago for my friend and bag pattern-maker, Samantha!  With two weddings coming up next month, it was exceptionally good timing that Samantha asked me to try out her pattern for the adorably-named "Little Bow Pleat Bag"--a stylish (yet roomy!) clutch.  Her request came right before I finalized my fabric purchases for my Cambie dress, so I bought some extra hot pink silk taffeta, knowing it would be put to use for this bag.  Maybe it's a little matchy-matchy, but I don't care!
As with all of Samantha's patterns, the instructions are very clearly written (with some cute British wording thrown in!)  and I was able to easily finish this bag in a less than 2 hours. Samantha just posted all of her pattern testers' versions, and each is beautiful and unique.
The inside is large enough to carry all the essentials (and then some), with a single zipper pocket for holding the stuff you don't want rolling around in your bag.  The pattern even comes with an option for attaching a chain strap, if you don't want to carry it around as a clutch.  (And yes, I went there and used the dress fabric for the lining.  And if you didn't think so before, yep, now it's too matchy-matchy :)
I feel so on-top of things to have my dress and bag (and shoes!) sorted out for the upcoming weddings. Count that as just about the only thing I'm on top of, having just finished my first week back to school!
As an aside, I had pattern tested the "big" version of this bag, the original "Bow Pleat" (above), quite some time ago, but never posted about it.  Samantha is running a special deal if you purchase both patterns, so check out her Etsy site for more details.  Each bag is suitable for many different types of fabric, giving a different look and feel.  With the slouchy linen fabric, this one reminds me of touring around an ocean-front boardwalk in the summer....
And now for the giveaway: If you love the "Little Bow Pleat Bag" as much as I do, leave a comment below and I will choose someone at random to receive a copy of the pattern!  I will select the winner on Sunday at 10 p.m. PST.  Be sure to include your email contact, otherwise I can't tell you you've won, and that would be pretty terrible.   Thanks Samantha, for providing the pattern!

Sunday, September 22, 2013

Back to school Cambie

After a significant time away, I'm back to work on Monday.  Clearly, I need a back-to-school dress! Having just made a party dress using the gathered-skirt style, I whipped up the A-line version of the Cambie for work.  I love the tailored fit of this version and the slant pockets.  Man, this pattern is versatile!
The fabric is a peacock-blue double-wool with lycra (Britex, bought in the remnants department), perhaps a bit thick for this dress, but really lovely to sew and wear.  Because of the weight of the fabric, I went with a simple pleat on the "sleeve" instead of gathering the fabric.  And I love the result--seems a bit vintage-y and definitely suits the style of the dress.
I made a slight sway-back adjustment, which is an easy alteration with this particular pattern since there is are center back and waist seams.
Since the "sleeves" aren't too bulky, I can definitely wear a cardigan over this dress when it gets a little chilly; along with pockets, being"cardigan-able" is a super important feature of any me-made article of clothing.
For the inside, I used a super pale green bemberg lining and the sweetest navy and white polka dot stretch silk (Britex, also from the remnants department).   If only everyone could see the inside band of this dress!


I'm not going to lie, I struggled with the lining hem.  Ugh.  But I used lace hem tape for the wool, something I've never used before (really!), and, folks, I hand sewed the hem.  That is almost unheard-of for me, but I splurged and bought some silk thread and that made it feel a bit like less of a chore.
A new school year, and a new dress.  Guess that's worth smiling about!
P.S.  Last year at this time, I made another back-to-school dress (with Britex fabric), here.  

Thursday, September 19, 2013

From California to Australia: Sweet pouch swap


Since Dee has received the pouch I made for her, now I can show it off!  In our initial emailing, Dee said she liked bright colors, like red and turquoise, and paisley, so I chose a bright paisley fabric from Hart's and used some red silk upholstery fabric from FabMo.  
The lining fabric is an over-sized shadow dot (also from Hart's).  It seemed perfect for a someone who likes red and turquoise, no?
The button detail is actually two buttons, sewn together.  I couldn't believe how well they fit together!
And, of course, the sweets. Since we live in the SF Bay Area, I had to include some local favorites: TCHO and Ghirardelli.  The Justin's Peanut Butter cups aren't from CA (CO instead), but are tasty enough that it doesn't even matter where they're from.
Dee reports that she liked her sweet pouch, which is great, and I was just happy the customs officials let it pass through!  (All I could picture was some guy in his office, chowing down on Dee's chocolates and chucking the pouch in the trash...)  Even though it was a little worrying to be choosing fabrics for someone I don't know too well, it was also loads of fun....hopefully, I can be involved with the official version the next time it's held!  Thanks again, Dee and Samantha!


Wednesday, September 18, 2013

Crashing the "Sweet Pouch Swap" party

Even though I wasn't quick enough to get in on the *very* exclusive official Sweet Pouch Swap this time around, my friend Samantha acted as match-maker and coordinated Dee and I to swap pouches and sweets anyhow!  Unsanctioned sweet sending, guerrilla pouch swapping, pouch party crashing, whatever it is, today I received the very lovely and very sweet pouch from Dee all the way from Australia.  It was torture to have to ride my bike the whole mile home from the post office, staring at the package in my basket, before I could rip into it.   But it was well worth the wait!
Yellow and blue!  My favorite colors!  See how nicely it coordinates with the color of my sewing room?  It is destined to be a sewing tools pouch (which is timely since I need my other pouch back for school supplies!).  The pouch is quite spacious, and I was fortunate enough to have received it just filled with Australian goodies:
I may or may not have already eaten one (or possibly two) pieces before taking this photo :)  So many sweets AND a cute felt flower pin, too.  Wow!  Many thanks (and hugs!) to Dee; she put together such a beautiful and thoughtful package.  

Once I hear that she's received my sweets and pouch, I'll reveal what I sent to her!  So much fun!

Sunday, September 15, 2013

Tutorial: Water-resistant phone pouch

Today was the final straw:  yet another zip-top baggie on the table after my husband returned from a long ride on his bike.  A cell phone, ID and cash is essential when either of us go for a ride, but whereas I can shove all that in my cavernous underseat bag (along with spare tube and wrench), my husband likes his phone in his jersey pocket and thus needs something moderately water-resistant (hence, the baggie).  It doesn't rain much here in Northern California, but early mornings can be darn foggy, and well, sweat is an issue.  After buying some of this incredible bicycle print PUL for swimsuit wetbags, I couldn't put it off any more. My husband (and I!) need zipper pouches for cycling.  Here's how to make your own water-resistant phone pouch, with lapped zipper, using your phone's own dimensions.

Monday, September 09, 2013

First (but not the last) Cambie

Of all the patterns by Tasia at Sewaholic, I've been most drawn to the Cambie.  I'm fairly pear-shaped and the style of the dress is pretty good for my figure.  The 20% off discount through Sew Mama Sew and the SOSM convinced me to finally plunk down the money for the pattern!  Seriously, I don't know why I waited so long.
Pockets!
As a contestant in the SOSM, I had a feeling the Cambie would be the final challenge, and the three finalists did fabulous interpretations of the pattern.  As much as I wished I had been able to compete in those later challenges, it was nice being able to make something for the love of sewing, without worrying so much about changing up the pattern or coming up with something new, novel and extra-special.   It's also a bit of a relief knowing I don't have to expertly finish each and every seam :)
Full back coverage--love!
This dress wasn't my original plan for this pattern--I actually unpinned the Cambie pattern pieces from a different fabric (a silk/cotton plaid suiting that I still intend to use!) to make this version first.  This Anna Sui silk/cotton voile from Mood was purchased to be a top of some kind, but the print was larger than I'd expected, so I immediately switched gears to sew it up as a dress.   
Incredibly, I managed to eek out the shell of this full-skirted dress out of only 2 yards of 44" wide fabric!   To do this, I reduce the the back panels of the skirt to be same width (+ seam allowance) as half of the front panel.  I'm not sure why the back panels are drafted to be quite so full, but I think my version is plenty full enough!  For sizing, I cut size 2 for bust and hips and graded up to size 4 for the waist.  I also did a petite adjustment on the bodice (and think I could use a tiny bit more) and the shoulder seam.  
The hot pink silk taffeta waistband totally makes this dress, in my opinion.  I only wish the pink in the design was a little more apparent!
Back waistband and invisible zipper
I don't love full skirts ordinarily but chose that version of this dress because the fabric was so lightweight, and thus more suitable for gathering.  But I didn't want even more bulk in that particular area, so the dress lining is actually the A-line version of the pattern (in 100% silk, crepe-ish type fabric). I called my mom to get a second opinion of the idea before cutting my silk, but it worked really well! The two fabrics don't cling together, so the overskirt flows over the narrower lining.
The seams were serger-finished, with a blind-stitched hem for the outer skirt and a regular straight stitch for the lining.  
I am completely in love with this pattern.  The style is just right, the full-coverage back is good for me and I adore the way Tasia sews the lining sewn into the dress (so clean and perfect!).  Literally, my biggest beef is something I could fix easily myself (and should have for this dress) and that's simply that I'd like the pockets to extend up to be sewn into the waistband.  Other than that, I can see using this pattern for work dresses or even more fancy frocks than this one (all-over lace anyone?).
This one will likely get worn with a great pair of brown patent and suede d'Orsay heels to one of two weddings we have in October.  (By the way, would it be completely gauche to wear it to both?  The weddings are on opposite coasts and there will be no overlapping attendees, except for the omnipresent Facebook...)   In any case, the dress fabric came in at under $60, and considering it's mostly silk, that's a darn reasonable party dress!

Monday, September 02, 2013

Carpool dress

After seeing Rae's recent maxi-dress, I was reminded that I had an unfinished item glaring at me in my sewing room, with fabric purchased from way back when she first posted about this great striped knit.
I'm calling this my Carpool Dress, since it's a comfy yet ladylike dress that one might wear if one carpooled. Which we actually don't, because our station wagon doesn't fit three carseats/boosters across the back.  Oops. Should have checked that out when we bought it!
Apologies for the wrinkles.  I took the photos after a full day of life with kids, including a nap with the toddler, bike ride to the cafe, cooking dinner (recipe from this fab cookbook) and bath time.  But hey, I can still look half-way decent after doing all that stuff, so this dress is a winner!
My original incarnation had a dirndl-style gathered skirt, which was poorly attached and in all other ways unattractive.  (Gah!  I always forget to take photos of stuff that doesn't work.  Next time!)  I had drafted the bodice and spent some time fitting it so I was loathe to just throw in the towel when the skirt failed.  And so it sat on my pile of fabric until I needed a reason to procrastinate [from working on the pants]. After cutting off the other skirt, I used the skirt pieces from this dress, placing the center front on the fold and adding my standard pockets.
The back was a little more unfitted than I prefer, so I zig-zagged in some elastic and then added a self-fabric belt.  The belt is stitched down at the sides so I don't have to fiddle with it all day.
One thing I absolutely love about this dress (other than it feels like I'm wearing a nightgown) is that the top is lined!
The bodice was cut in both outer and lining fabric and the shoulder seams were sewn for both. Then, I attached outer to lining at the neckline, stitching all the way around.  I flipped them the correct way, pressed to keep them in place and sewed the rest of bodice (sleeves and side seams) as if it were a single piece of fabric (I may have finished the edges to keep them together (forgive my memory, it's been a while!)).
With the lining sewn this way, the neckline is super clean and the bodice has slightly more structure.
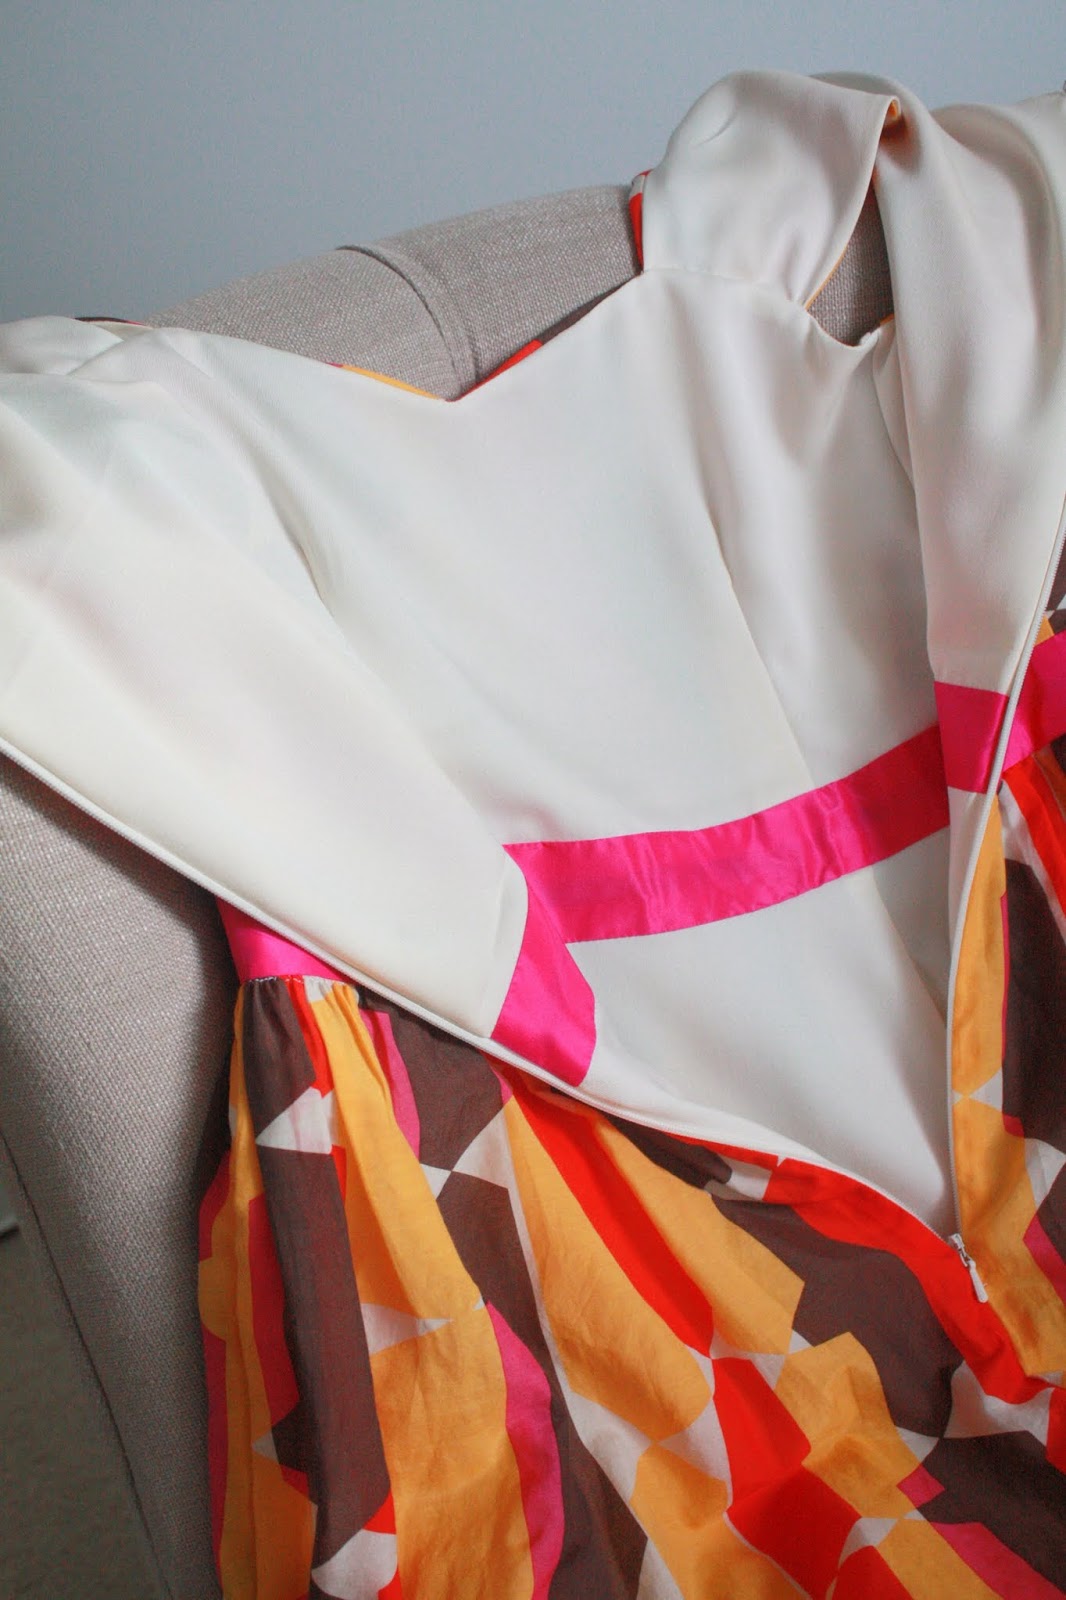
This is a darn unattractive view, but it shows how it all looks on the inside.  The bodice lining is swimsuit lining fabric, which worked beautifully--stretchy and lightweight.  The pockets were made from a different type of swimsuit lining fabric (using scraps for both), and that fabric is more slippery, which works great for pockets.  I used clear elastic at the shoulders and the front seam of the pockets, to keep the shape in those areas.
The hem and sleeves are finished with my coverstitch machine.  
Let's recap: pockets, stripes, knit fabric, non-clingy shape and I can ride my bike while wearing it. Yeah, that's pretty much a perfect garment in my book!    Just FYI, I think the "Lady Skater" dress would be the way to go if you want to the same dress shape :)